从0到1搭建GitLab&CICD
GitLab
什么是GitLab?
GitLab是一个基于Web的Git仓库管理工具,可以帮助团队协作开发。类似于GitHub,GitLab可以存储代码、管理版本、跟踪问题、管理工作进程、进行代码审查等。但与GitHub不同的是,GitLab提供了更多的功能,如内置CI/CD、容器注册表、监控等。
GitLab由GitLab Inc.开发和维护,有两个版本:社区版和企业版。社区版是免费的,但功能相对较少;企业版需要付费,但提供更多的功能和支持。
GitLab的主要特点包括:
- 代码托管:支持Git和SVN等版本控制系统。
- 问题跟踪:可以创建和管理问题、缺陷和需求等。
- 代码审查:可以进行代码审查和合并请求,确保代码质量。
- CI/CD:内置CI/CD功能,可以自动化构建、测试和部署应用程序。
- 容器注册表:可以存储和管理容器镜像,方便应用程序部署。
- 监控:可以监控应用程序的性能和可用性等指标。
总之,GitLab是一个功能强大的协作开发工具,可以帮助团队更好地协作开发、提高代码质量和加速交付流程。
配置要求
GitLab官方硬件要求:
建议服务器最低配置:
- 2核 2G以上内存(不包含2GB,2GB内存运行的时候内存直接爆掉)
官网给出的推荐配置:
- 4核 4GB内存 支持500个用户
- 8核 8GB内存 支持1000个用户
GitLab服务器安装教程
Ubuntu服务器部署流程(推荐):
安装GitLab服务器
- 安装依赖
sudo apt update sudo apt-get upgrade sudo apt-get install curl openssh-server ca-certificates postfix - 运行安装包安装命令,通过wget方式在线安装gitlab,相应的安装包地址请从gitlab官网拷贝
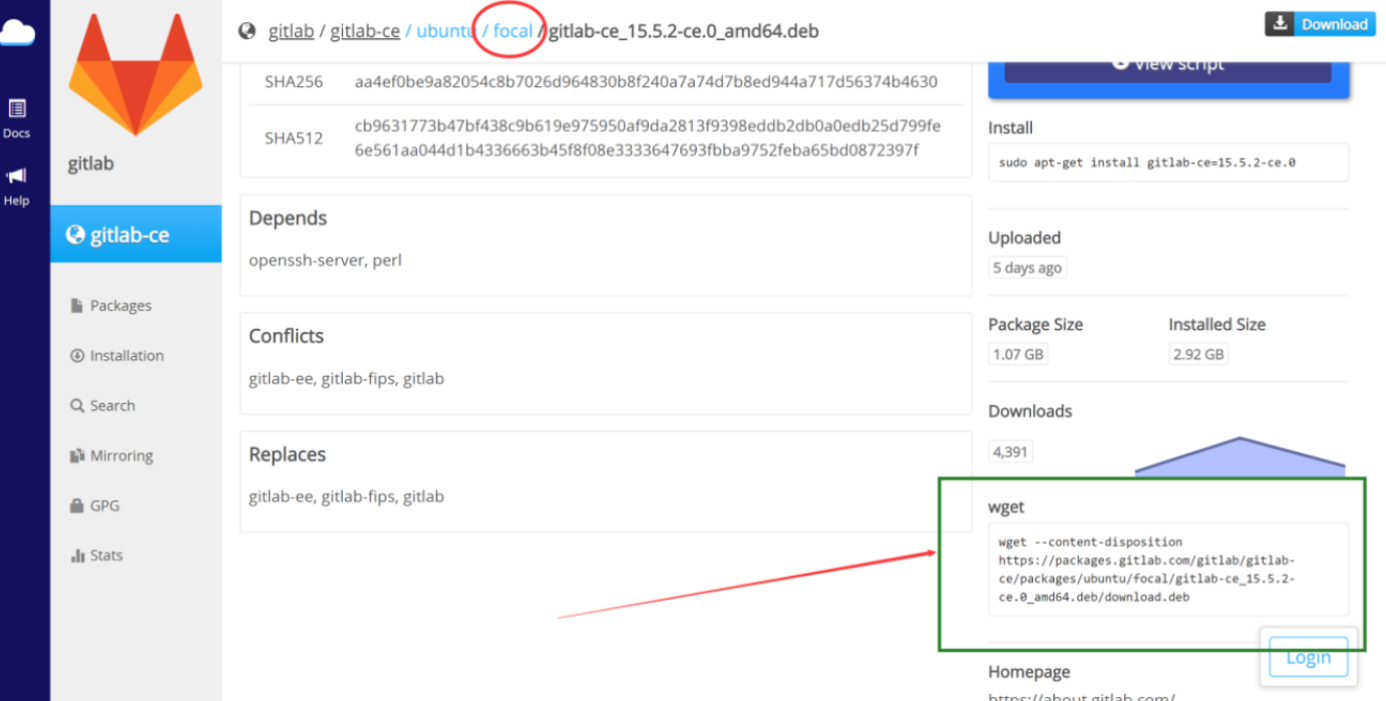
安装命令:
wget --content-disposition https://packages.gitlab.com/gitlab/gitlab-ce/packages/ubuntu/focal/gitlab-ce_15.5.2-ce.0_amd64.deb/download.deb

sudo dpkg -i gitlab-ce_15.5.2-ce.0_amd64.deb
如果运行dpkg报openssh-server相关的错误,请先执行下面三个命令:
sudo apt --fix-broken install

sudo apt-get update

sudo apt-get upgrade
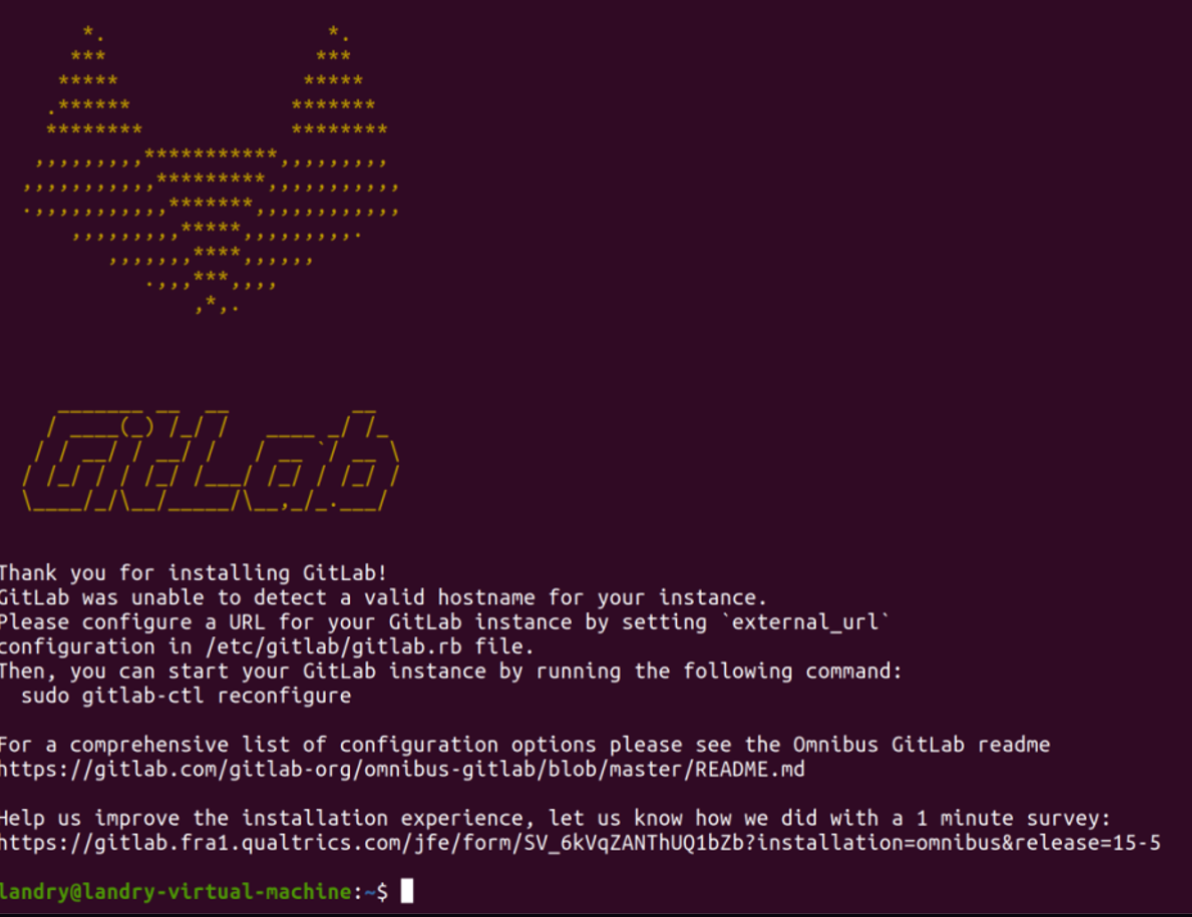
运行完sudo dpkg安装命令后如果出现下面的界面则gitlab安装成功了!
3、配置gitlab
sudo rm /var/lib/dpkg/lock*
# 如果出现vim识别不了的报错,运行下面两行命令即可
sudo apt-get update
sudo apt-get install vim
进入gitlab的配置文件修改界面:
sudo vim /etc/gitlab/gitlab.rb
# 如果运行上述命令出现权限问题,运行下列命令即可:
chmod -R 755 /var/log/gitlab
输入i进入编辑模式,然后找到external_url字段(一般在第32行),改成自己需要设置的IP和端口号:
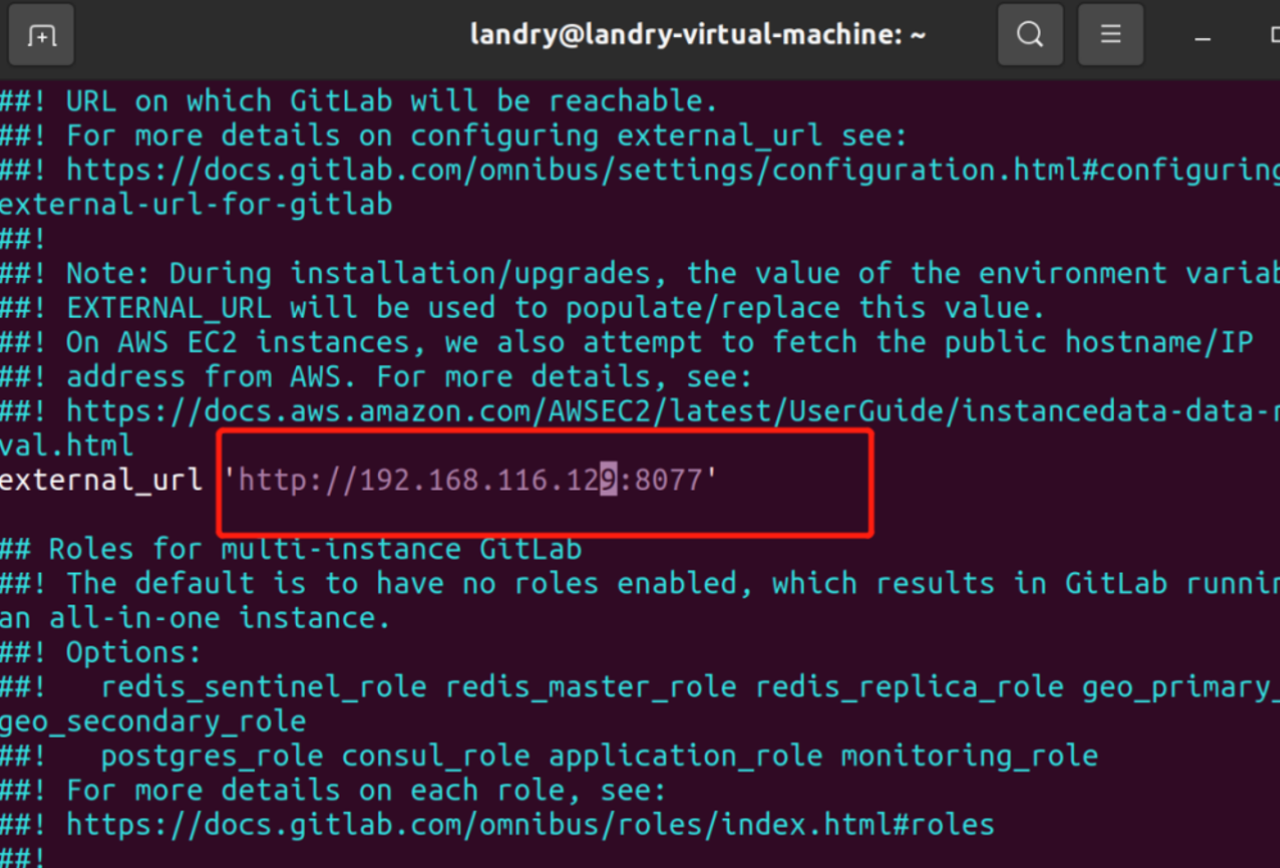
改完以后输入esc退出编辑,然后输入:wq保存即可。接下来通过下列命令重启服务。
# 停止gitlab服务
sudo gitlab-ctl stop

# 启动gitlab服务
sudo gitlab-ctl reconfigure

# 重启所有gitlab组件
sudo gitlab-ctl restart

# 启动所有gitlab组件
sudo gitlab-ctl start

# 启用开机自启动
sudo systemctl enable gitlab-runsvdir.service
4、初始化root的密码
# 1) 切换到相应路径下:
cd /opt/gitlab/bin/

# 2) 打开控制台:
sudo gitlab-rails console -e production

# 3) 查询用户账号信息并赋值给u:
u=User.where(id:1).first

# 4) 设置该用户名的密码:
u.password='12345678'

# 5) 确认密码:
u.password_confirmation='12345678'

# 6) 保存信息:
u.save

# 7) 退出:
exit
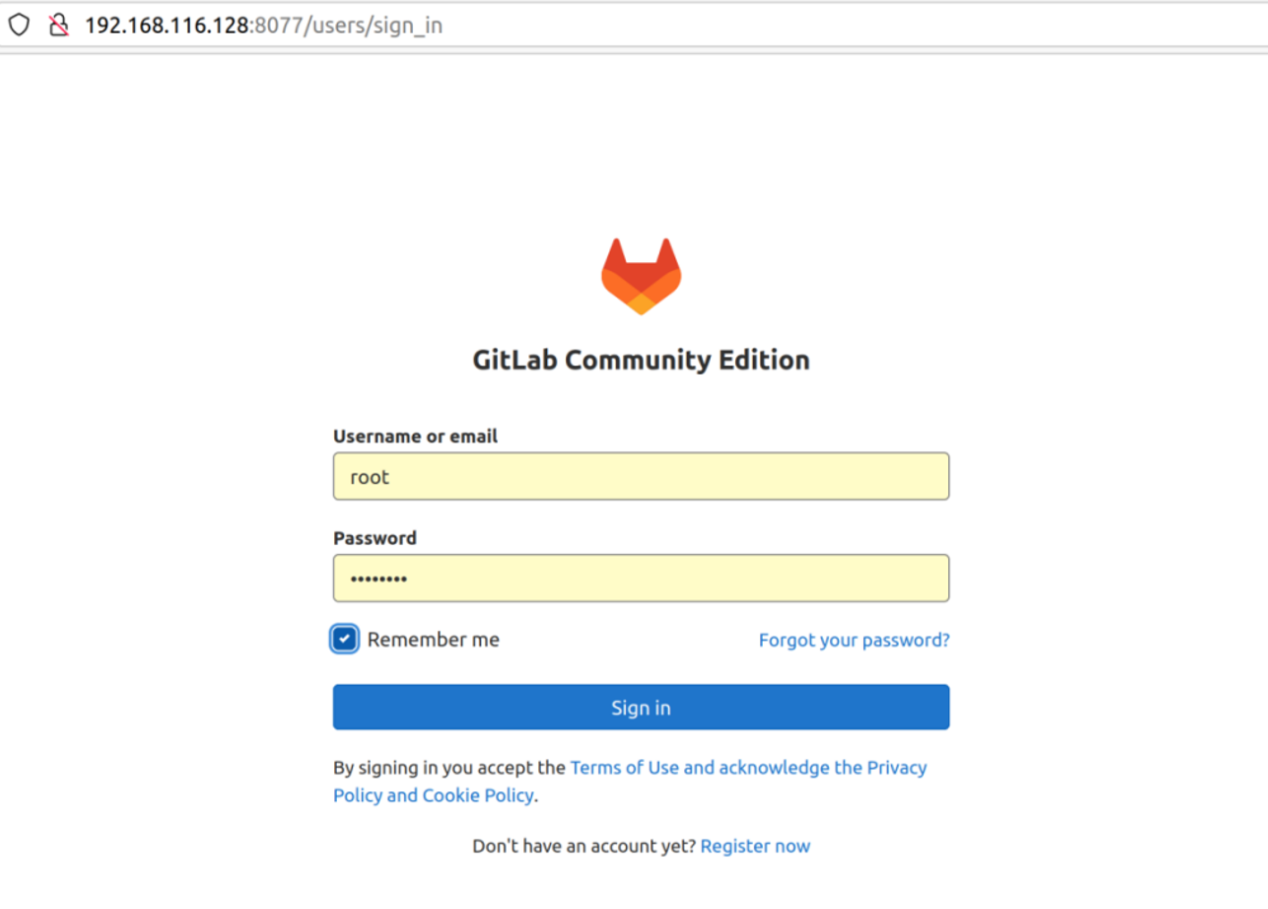
经过以上操作以后就可以通过http://192.168.116.128:8077来登录gitlab了。
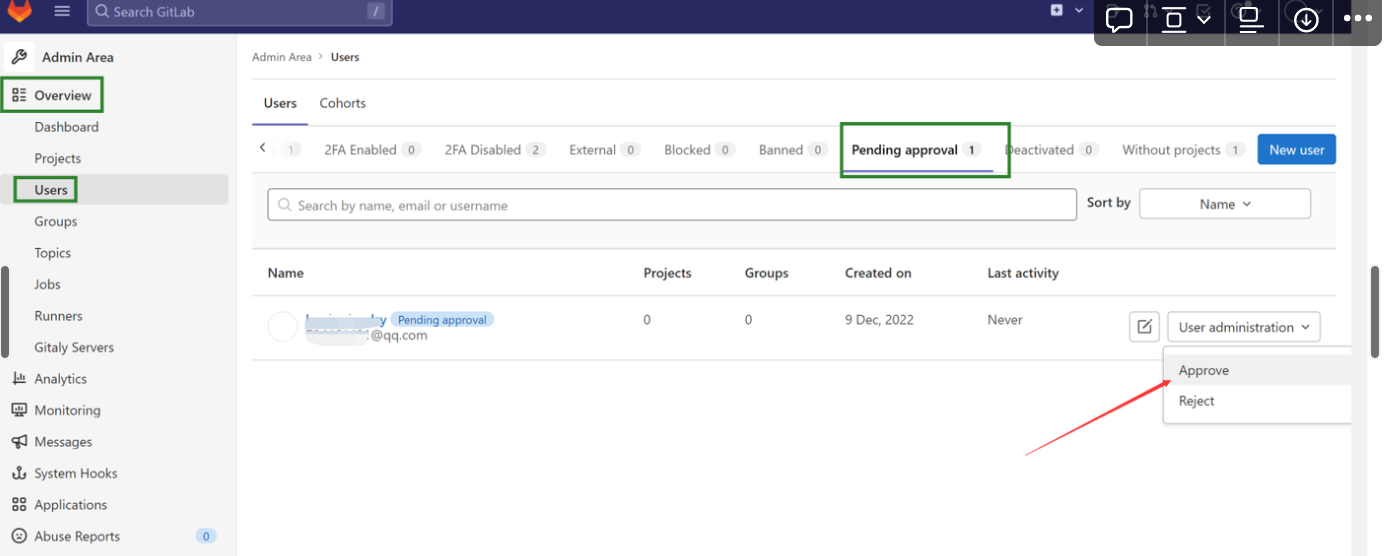
二、Gitlab注册新用户
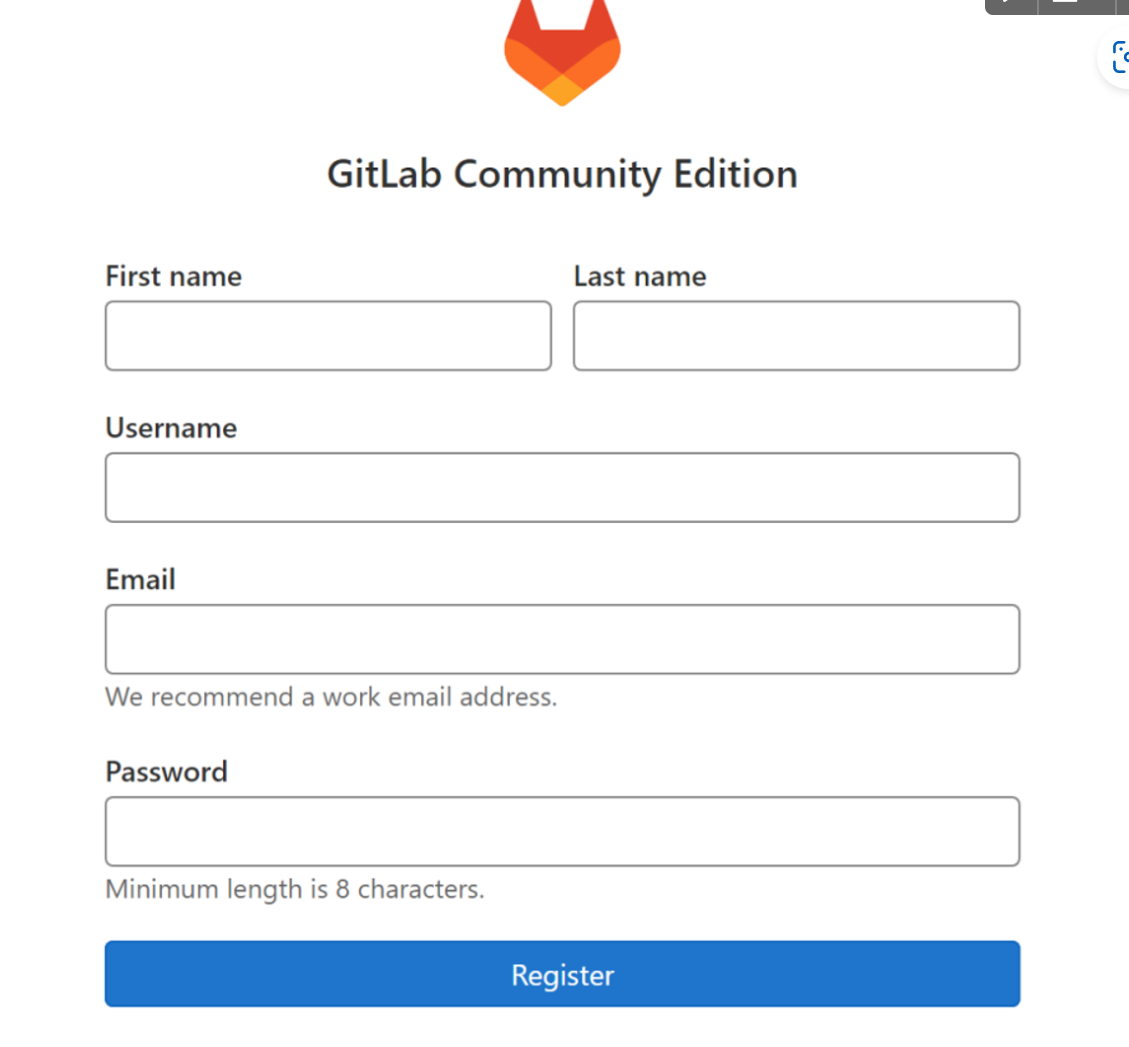
经过以上两步就注册了一个新的账户,此时需要等待root管理审核并批准该账户以后该账户才能够使用,否则没法登录gitlab平台。
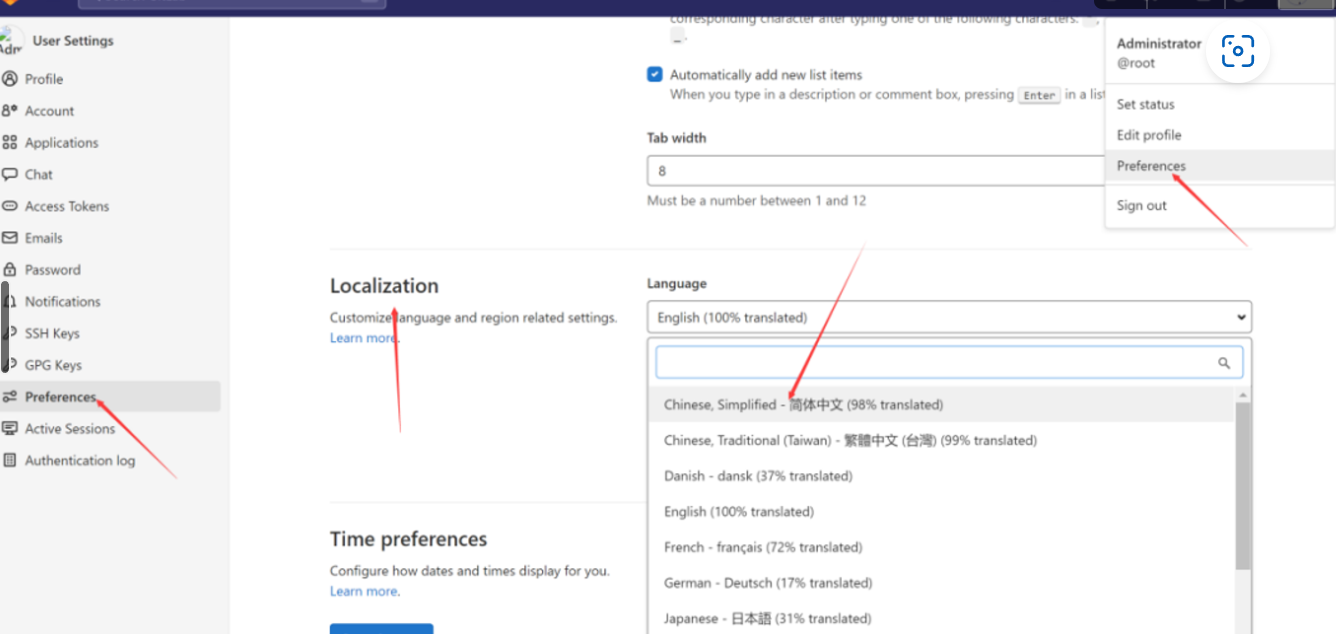
- 设置中文界面
Linux注册Runner服务
安装runner服务器
# Download the binary for your system

sudo curl -L --output /usr/local/bin/gitlab-runner https://gitlab-runner-downloads.s3.amazonaws.com/latest/binaries/gitlab-runner-linux-amd64

# Give it permission to execute

sudo chmod +x /usr/local/bin/gitlab-runner

# Create a GitLab Runner user

sudo useradd --comment 'GitLab Runner' --create-home gitlab-runner --shell /bin/bash

# Install and run as a service

sudo gitlab-runner install --user=gitlab-runner --working-directory=/home/gitlab-runner
sudo gitlab-runner start
注册 runner
步骤 1:复制并粘贴以下命令到您的命令行中,注册 runner。
$ gitlab-runner register --url https://gitlab.com --token <生成的令牌>
Runner 令牌 <生成的令牌> 只在短时间内显示 ,在您注册 runner 后,存储在 config.toml 中。一旦 runner 注册后,它将不可见。
步骤 2
当命令行提示时,选择一个执行器。执行器在不同的环境中运行构建。 不能确定选择哪一个?
步骤 3(可选)
手动验证 runner 是否可以选中作业。
$ gitlab-runner run
常用命令
# 查看gitlab-runner 服务状态
sudo gitlab-runner status
# 启动gitlab-runner 服务
sudo gitlab-runner start
# 停止gitlab-runner 服务
sudo gitlab-runner stop
卸载runner
要卸载GitLab Runner,您可以按照以下步骤进行操作:
停止GitLab Runner服务:
sudo gitlab-runner stop移除GitLab Runner二进制文件:
sudo rm /usr/local/bin/gitlab-runner删除GitLab Runner配置文件和数据目录(默认情况下是/etc/gitlab-runner和/var/lib/gitlab-runner):
sudo rm -rf /etc/gitlab-runner /var/lib/gitlab-runner使用适用于您的操作系统的命令,删除GitLab Runner的服务配置:
对于Systemd(如Ubuntu 16.04+或CentOS 7+):
  sudo systemctl disable gitlab-runner
  sudo systemctl stop gitlab-runner
  sudo rm /etc/systemd/system/gitlab-runner.service
  sudo systemctl daemon-reload
对于SysVinit(如Ubuntu 14.04或CentOS 6):
  sudo update-rc.d gitlab-runner disable
  sudo service gitlab-runner stop
  sudo rm /etc/init.d/gitlab-runner
最后,根据您使用的包管理器,选择执行以下命令来卸载GitLab Runner:
对于APT包管理器(如Ubuntu):
sudo apt remove gitlab-runner对于YUM包管理器(如CentOS):
sudo yum remove gitlab-runner对于DNF包管理器(如Fedora):
sudo dnf remove gitlab-runner对于ZYpp包管理器(如openSUSE):
sudo zypper remove gitlab-runner
完成上述步骤后,您已成功卸载GitLab Runner。
502报错解决办法
一、错误页面
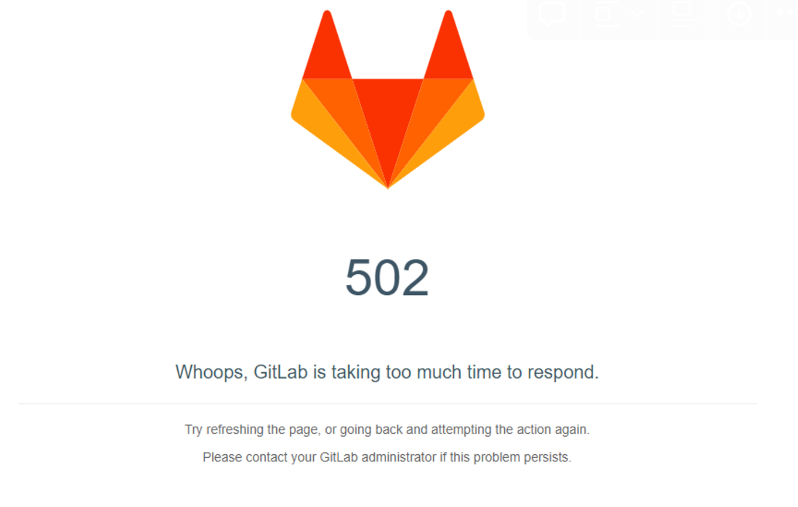
错误原因:
原来默认配置的8080端口号被其他应用占用冲突了,只需换成其他新的端口号就可以了
二、修复步骤
1.首先vim /etc/gitlab/gitlab.rb打开配置文件
2.修改配置
找到如下配置项,原来是用#注释的,把前面的#去掉取消注释,原来的默认端口号应该是8080,改成你自己想要的端口号。
注意新配置的端口号不要被其他进程占用,且要在防火墙设置放开
使用的服务有两种——unicorn和puma,根据自己使用的服务来修改
(1)如果服务用的是unicorn
unicorn['port'] = 8099
(2)如果服务用的是puma
puma['port'] = 8091
3.输入如下命令让配置生效
sudo gitlab-ctl reconfigure
4.最后重启服务
sudo gitlab-ctl restart
注意:如果重启服务没用作用的话,就直接kill掉进程,重新启动。
因为重启服务后刷新可能不能马上成功,差不多要等个一分钟左右再重新刷新页面就成功了,如下图所示,完美
服务器配置小于2核2g用以下连接调整配置(不推荐,容易崩)
注册Runner
- docker注册(推荐)
gitlab runner性能优化
runner注册
创建变量
GitLabServer='http://gitlab服务器地址/' # gitlab服务器地址
GitLabToken='xxxx' # gitlab 仓库地址token
GitLabRunnerNamePrefix='g' # gitlab runner 前缀
GitLabRunnerTags='develop' # gitlab runner tags
GitLabRunnerDesc='develop' # gitlab runner desc
GitLabRunnerImg='gitlab/gitlab-runner:v14.10.1' # gitlab runner img

## 实践
GitLabServer='http://www.gitlab.faceman.cn/' # gitlab服务器地址
GitLabToken='GR13489419enDbCg8oyuxf1ytx4nS' # gitlab 仓库地址token
GitLabRunnerNamePrefix='g' # gitlab runner 前缀
GitLabRunnerTags='dev' # gitlab runner tags
GitLabRunnerDesc='dev' # gitlab runner desc
GitLabRunnerImg='gitlab/gitlab-runner:v14.10.1' # gitlab runner img
创建数据卷
docker volume create "$GitLabRunnerNamePrefix-gitlab-runner-conf"
创建runner
gitlab-runner镜像文件
docker run --network host -d --restart always \
-e TZ=Asia/Beijing \
-v /var/run/docker.sock:/var/run/docker.sock \
-v "$GitLabRunnerNamePrefix-gitlab-runner-conf":/etc/gitlab-runner \
--name "$GitLabRunnerNamePrefix-gitlab-runner" $GitLabRunnerImg
注册runner
docker run --rm \
-v "$GitLabRunnerNamePrefix-gitlab-runner-conf":/etc/gitlab-runner \
-v /var/run/docker.sock:/var/run/docker.sock \
--name "$GitLabRunnerNamePrefix-gitlab-runner-register" $GitLabRunnerImg register \
--url "$GitLabServer" \
--registration-token "$GitLabToken" \
--description "$GitLabRunnerDesc" \
--tag-list "$GitLabRunnerTags" \
--non-interactive \
--executor "docker" \
--docker-image docker:19.03.12 \
--docker-privileged="true" \
--docker-volumes "/certs/client" \
--run-untagged="true" \
--locked="false" \
--access-level="not_protected" \
--docker-volumes /var/run/docker.sock:/var/run/docker.sock
删除runner
docker stop "$GitLabRunnerNamePrefix-gitlab-runner"
docker rm "$GitLabRunnerNamePrefix-gitlab-runner"
docker volume rm "$GitLabRunnerNamePrefix-gitlab-runner-conf"
runner清理
删除玄虚镜像
玄虚镜像是未标记且未被任何容器使用的镜像。 -a 未使用的镜像
docker image prune -a
运行此命令时要小心。如果你构建的图像没有标签,它将被删除。
- linux注册runner
CICD
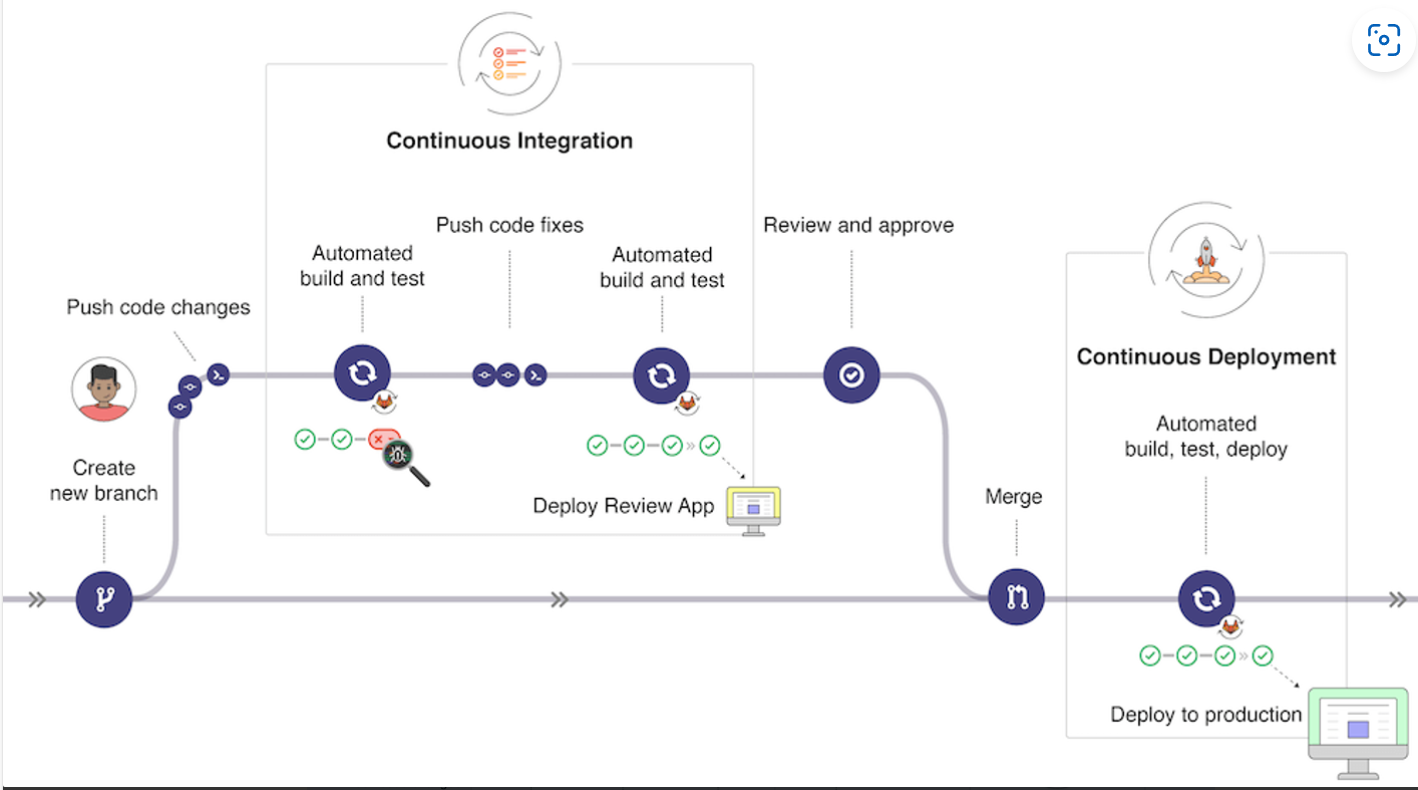
什么是CICD?
持续集成(CI)
持续集成是一种开发实践,旨在通过频繁地集成代码变更到共享的主干分支,确保团队成员的代码能够持续地、快速地集成到共同的代码仓库中。主要特点包括:
- 频繁提交代码变更:开发人员将代码变更提交到版本控制系统,通常是多次提交而不是长时间的开发周期。
- 自动化构建和测试:提交代码后,自动进行构建和运行各种测试,包括单元测试、集成测试等。
- 快速反馈:及早发现和解决代码集成问题,通过自动化测试和即时反馈提高代码质量。
- 集成检查和冲突解决:团队成员将代码合并到主干分支之前,确保代码的一致性和避免冲突。
持续交付(CD)
持续交付和持续部署是在持续集成基础上的进一步自动化,旨在快速、可靠地将软件交付给用户或部署到生产环境。主要特点包括:
- 自动化构建、测试和部署:在代码通过持续集成流程后,自动进行构建、自动化测试并将软件包部署到目标环境。
- 灵活的部署策略:可以根据需求选择自动化部署或手动触发部署,并支持多个部署环境,如开发、测试和生产环境。
- 自动化回滚:在部署过程中,如果出现问题,可以自动回滚到上一个可靠的版本。
- 可重复和可靠的发布过程:通过自动化脚本和工具确保发布过程的一致性和可重复性,减少人为错误。
总体而言,持续集成和持续交付/持续部署旨在改善软件开发流程,促进团队协作、提高代码质量,并实现快速、可靠的软件交付。持续集成确保开发人员的代码及时集成到主干分支,而持续交付/持续部署则进一步自动化了构建、测试和部署过程,以实现快速、可靠的交付流程,确保软件能够迅速地交付给用户或部署到生产环境。通过持续集成和持续交付/持续部署,团队能够更好地应对市场需求变化、快速迭代和交付高质量的软件。
在持续集成和持续交付/持续部署的流程中,借助自动化工具和技术,例如持续集成服务器(如GitLab CI/CD)、自动化构建工具(如Maven、Gradle)、自动化测试框架和自动化部署工具等,能够达成以下目标:
- 更快的交付周期:快速地构建、测试和部署应用程序,缩短交付周期,迅速响应用户需求。
- 提高软件质量:持续集成通过频繁集成和自动化测试,及时发现和解决问题,减少集成错误,降低人为错误,确保交付的软件质量。
- 降低风险:通过自动化的构建、测试和部署过程,减少人为操作的风险,确保每次交付都是可靠和可重复的。
- 加强团队协作:鼓励团队成员频繁提交代码变更和集成,加强团队协作和沟通,促进问题的早期发现和解决。
- 快速回滚和发布修复:使团队能够快速回滚到上一个稳定版本或发布修复版本,降低问题的影响范围和修复时间。
综上所述,持续集成和持续交付/持续部署是现代软件开发流程中的重要环节,通过自动化和频繁交付的方式,提高软件质量、加快交付速度,并增强团队协作和灵活性,使得软件开发团队能够更加高效地交付高质量的软件。
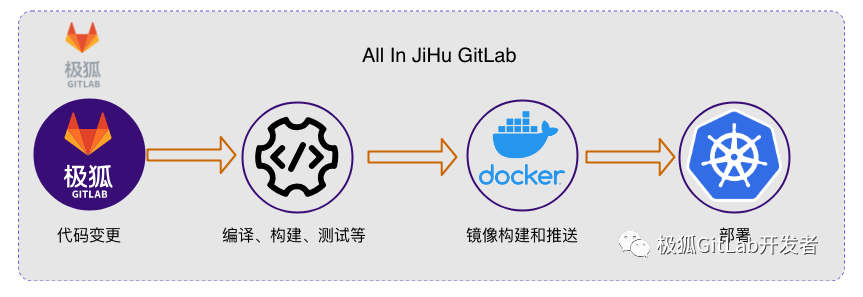
Gitlab CI/CD功能和架构
GitLab CI/CD是GitLab提供的一套持续集成和持续交付工具,可以自动化执行应用程序的构建、测试和部署。它采用了基于YAML的配置文件来定义CI/CD流程,并结合GitLab的版本控制功能,实现了代码与构建、测试、部署等环节的紧密集成,具体而言,可以实现:
- 自动化构建:GitLab CI/CD可以根据开发人员提交的代码自动触发构建过程,生成可部署的应用程序包。
- 自动化测试:支持各种类型的测试,包括单元测试、集成测试和端到端测试等,以确保应用程序的质量。
- 自动化部署:可以将构建好的应用程序包自动部署到不同的环境,如开发、测试和生产环境。
- 可视化面板:提供了直观的界面来查看CI/CD流水线的状态和结果,方便开发团队进行监控和管理。
要掌握Gitlab CI/CD,需要先来了解一下一些关键概念:
- GitLab服务器:作为版本控制系统和CI/CD的核心,存储代码仓库和管理CI/CD流程。
- Runner:*是一个独立的工作单元,负责执行CI/CD流程中的任务。可以有多个Runner,并且可以分布在不同的机器上。
- Pipeline:*由一系列的Stage和Job组成,表示整个CI/CD流程。每个Stage包含一个或多个Job,按顺序执行。
- Job:*表示CI/CD流程中的一个任务,可以是构建、测试或部署等操作。
- Artifact:*表示CI/CD流程生成的产物,如构建生成的应用程序包或测试报告等。
gitab-ci.yml详解
实战案例
根目录.gitlab-ci.yml
# 从编译项目通过、构建包内容

# 编译项目为docker镜像,然后推送到仓库中

# 定义stages
stages:
  - build # 编译
  - publish # 发布
  - deploy # 部署
  - withdraw_deploy # 撤销部署

variables:
  TAG: $CI_COMMIT_REF_NAME
  IMAGE_NAME: 'faceman0814/aichatx'
  # 当前分支名称
  BRANCH: $CI_COMMIT_BRANCH
  # 镜像仓库信息
  CI_IMG_REGISTRY: $CI_REGISTRY_Docker
  CI_IMG_REGISTRY_USER: $CI_REGISTRY_USER
  CI_IMG_REGISTRY_PWD: $CI_REGISTRY_PASSWORD
  IMAGE_TAG: '0.3.12-test'

include:
  - local: ".gitlab/ci/docker-images.test-ci.yml"
ci/docker-images.test-ci.yml
# dev环境的镜像制作与部署

# host
build_host_dev:
  stage: build
  only:
    # 触发条件
    refs:
      # 分支
      - main-
    changes:
      # 目录改变
      - api/**/**
  tags:
    - dev
  retry:
    max: 2
  image:
    name: registry.cn-shanghai.aliyuncs.com/staneee/powershell:lts-debian-10-componse-1-29-2
    entrypoint: [ '' ]
  before_script:
    - docker login -u ${CI_IMG_REGISTRY_USER} -p ${CI_IMG_REGISTRY_PWD}
    # ${CI_IMG_REGISTRY}
  script:
    - cd ./api
    - docker build . --force-rm -t ${IMAGE_NAME}_api:${IMAGE_TAG}  -f Dockerfile
    - docker push ${IMAGE_NAME}_api:${IMAGE_TAG}
  after_script:
    - docker image prune -f
    - docker volume prune -f

# web ui
build_web_dev:
  stage: build
  only:
    # 触发条件
    refs:
      # 分支
      - main-
    changes:
      - web/**/**
  tags:
    - dev
  retry:
    max: 2
  image:
    name: registry.cn-shanghai.aliyuncs.com/staneee/powershell:lts-debian-10-componse-1-29-2
    entrypoint: [ '' ]
  before_script:
    - docker login -u ${CI_IMG_REGISTRY_USER} -p ${CI_IMG_REGISTRY_PWD}
    #  ${CI_IMG_REGISTRY}
  script:
    - cd ./web
    - docker build . --force-rm -t ${IMAGE_NAME}_web:${IMAGE_TAG} -f Dockerfile
    - docker push ${IMAGE_NAME}_web:${IMAGE_TAG}
  after_script:
    - docker image prune -f
    - docker volume prune -f

# 部署
deploy_dev:
  stage: deploy
  only:
    # 触发条件
    refs:
      # 分支
      - main
  tags:
    # 运行runner
    - dev
  retry:
    # 重试次数
    max: 2
  image:
    name: registry.cn-shanghai.aliyuncs.com/staneee/powershell:lts-debian-10-componse-1-29-2
    entrypoint: [ '' ]
  before_script:
    - docker login -u ${CI_IMG_REGISTRY_USER} -p ${CI_IMG_REGISTRY_PWD}
    #  ${CI_IMG_REGISTRY}
  script:
    - docker stack rm ${IMAGE_NAME}_test
    - sleep 20
    # 部署 执行stack
    - cd ./docker
    - ls
    - docker stack deploy --resolve-image=always -c docker-compose.yaml ${IMAGE_NAME}_test --with-registry-auth
    # 30秒后列出部署服务
    - sleep 30
    - docker service ls -f name=${IMAGE_NAME}_test

# 撤销部署
withdraw_deploy_dev:
  stage: withdraw_deploy
  when: manual
  only:
    # 触发条件
    refs:
      # 分支
      - main
  tags:
    - dev
  retry:
    max: 2
  image:
    name: registry.cn-shanghai.aliyuncs.com/staneee/powershell:lts-debian-10-componse-1-29-2
    entrypoint: [ '' ]
  script:
    # 删除服务
    - cd ./docker
    - docker stack rm ${IMAGE_NAME}_test
    # 30秒后列出部署服务
    - sleep 30
    - docker service ls -f name=${IMAGE_NAME}_test
docker/docker-compose.yaml
version: '3.9'
services:
  # API service
  api:
    image: ${IMAGE_NAME}-api:${IMAGE_TAG}
    restart: always
    networks:
      - net
    environment:
      # Startup mode, 'api' starts the API server.
      MODE: api
      # The log level for the application. Supported values are `DEBUG`, `INFO`, `WARNING`, `ERROR`, `CRITICAL`
      LOG_LEVEL: INFO
      # A secret key that is used for securely signing the session cookie and encrypting sensitive information on the database. You can generate a strong key using `openssl rand -base64 42`.
      SECRET_KEY: 6Ua9rZwoOmPs2oIyUWPt0W5JSX5+htjgrK7A+4nVVMJ2srX7g19ecXqF
      # The base URL of console application web frontend, refers to the Console base URL of WEB service if console domain is
      # different from api or web app domain.
      # example: http://cloud.dify.ai
      CONSOLE_WEB_URL: 'http://192.168.197.128'
      # The base URL of console application api server, refers to the Console base URL of WEB service if console domain is
      # different from api or web app domain.
      # example: http://cloud.dify.ai
      CONSOLE_API_URL: 'http://192.168.197.128'
      # The URL for Service API endpoints,refers to the base URL of the current API service if api domain is
      # different from console domain.
      # example: http://api.dify.ai
      SERVICE_API_URL: 'http://192.168.197.128'
      # The URL for Web APP api server, refers to the Web App base URL of WEB service if web app domain is different from
      # console or api domain.
      # example: http://udify.app
      APP_API_URL: 'http://192.168.197.128'
      # The URL for Web APP frontend, refers to the Web App base URL of WEB service if web app domain is different from
      # console or api domain.
      # example: http://udify.app
      APP_WEB_URL: 'http://192.168.197.128'
      # When enabled, migrations will be executed prior to application startup and the application will start after the migrations have completed.
      MIGRATION_ENABLED: 'true'
      # The configurations of postgres database connection.
      # It is consistent with the configuration in the 'db' service below.
      DB_USERNAME: root
      DB_PASSWORD: bb123456
      DB_HOST: 118.89.117.182
      DB_PORT: 5432
      DB_DATABASE: fsm-test
      # The configurations of redis connection.
      # It is consistent with the configuration in the 'redis' service below.
      REDIS_HOST: redis
      REDIS_PORT: 6379
      REDIS_USERNAME: ''
      REDIS_PASSWORD: bb123456
      REDIS_USE_SSL: 'false'
      # use redis db 0 for redis cache
      REDIS_DB: 0
      # The configurations of session, Supported values are `sqlalchemy`. `redis`
      SESSION_TYPE: redis
      SESSION_REDIS_HOST: redis
      SESSION_REDIS_PORT: 6379
      SESSION_REDIS_USERNAME: ''
      SESSION_REDIS_PASSWORD: bb123456
      SESSION_REDIS_USE_SSL: 'false'
      # use redis db 2 for session store
      SESSION_REDIS_DB: 2
      # The configurations of celery broker.
      # Use redis as the broker, and redis db 1 for celery broker.
      CELERY_BROKER_URL: redis://:bb123456@redis:6379/1
      # Specifies the allowed origins for cross-origin requests to the Web API, e.g. https://dify.app or * for all origins.
      WEB_API_CORS_ALLOW_ORIGINS: '*'
      # Specifies the allowed origins for cross-origin requests to the console API, e.g. https://cloud.dify.ai or * for all origins.
      CONSOLE_CORS_ALLOW_ORIGINS: '*'
      # CSRF Cookie settings
      # Controls whether a cookie is sent with cross-site requests,
      # providing some protection against cross-site request forgery attacks
      #
      # Default: `SameSite=Lax, Secure=false, HttpOnly=true`
      # This default configuration supports same-origin requests using either HTTP or HTTPS,
      # but does not support cross-origin requests. It is suitable for local debugging purposes.
      #
      # If you want to enable cross-origin support,
      # you must use the HTTPS protocol and set the configuration to `SameSite=None, Secure=true, HttpOnly=true`.
      #
      # For **production** purposes, please set `SameSite=Lax, Secure=true, HttpOnly=true`.
      COOKIE_HTTPONLY: 'true'
      COOKIE_SAMESITE: 'Lax'
      COOKIE_SECURE: 'false'
      # The type of storage to use for storing user files. Supported values are `local` and `s3`, Default: `local`
      STORAGE_TYPE: local
      # The path to the local storage directory, the directory relative the root path of API service codes or absolute path. Default: `storage` or `/home/john/storage`.
      # only available when STORAGE_TYPE is `local`.
      STORAGE_LOCAL_PATH: storage
      # The S3 storage configurations, only available when STORAGE_TYPE is `s3`.
      S3_ENDPOINT: 'https://xxx.r2.cloudflarestorage.com'
      S3_BUCKET_NAME: 'difyai'
      S3_ACCESS_KEY: 'ak-difyai'
      S3_SECRET_KEY: 'sk-difyai'
      S3_REGION: 'us-east-1'
      # The type of vector store to use. Supported values are `weaviate`, `qdrant`.
      VECTOR_STORE: weaviate
      # The Weaviate endpoint URL. Only available when VECTOR_STORE is `weaviate`.
      WEAVIATE_ENDPOINT: http://weaviate:8080
      # The Weaviate API key.
      WEAVIATE_API_KEY: WVF5YThaHlkYwhGUSmCRgsX3tD5ngdN8pkih
      # The Qdrant endpoint URL. Only available when VECTOR_STORE is `qdrant`.
      QDRANT_URL: 'https://your-qdrant-cluster-url.qdrant.tech/'
      # The Qdrant API key.
      QDRANT_API_KEY: 'ak-difyai'
      # Mail configuration, support: resend
      MAIL_TYPE: ''
      # default send from email address, if not specified
      MAIL_DEFAULT_SEND_FROM: 'YOUR EMAIL FROM (eg: no-reply <no-reply@dify.ai>)'
      # the api-key for resend (https://resend.com)
      RESEND_API_KEY: ''
      # The DSN for Sentry error reporting. If not set, Sentry error reporting will be disabled.
      SENTRY_DSN: ''
      # The sample rate for Sentry events. Default: `1.0`
      SENTRY_TRACES_SAMPLE_RATE: 1.0
      # The sample rate for Sentry profiles. Default: `1.0`
      SENTRY_PROFILES_SAMPLE_RATE: 1.0
    depends_on:
      - redis
      - weaviate
    volumes:
      # Mount the storage directory to the container, for storing user files.
      - ./volumes/app/storage:/app/api/storage

  # worker service
  # The Celery worker for processing the queue.
  worker:
    image: ${IMAGE_NAME}-api:${IMAGE_TAG}
    restart: always
    networks:
      - net
    environment:
      # Startup mode, 'worker' starts the Celery worker for processing the queue.
      MODE: worker

      # --- All the configurations below are the same as those in the 'api' service. ---

      # The log level for the application. Supported values are `DEBUG`, `INFO`, `WARNING`, `ERROR`, `CRITICAL`
      LOG_LEVEL: INFO
      # A secret key that is used for securely signing the session cookie and encrypting sensitive information on the database. You can generate a strong key using `openssl rand -base64 42`.
      # same as the API service
      SECRET_KEY: 6Ua9rZwoOmPs2oIyUWPt0W5JSX5+htjgrK7A+4nVVMJ2srX7g19ecXqF
      # The configurations of postgres database connection.
      # It is consistent with the configuration in the 'db' service below.
      DB_USERNAME: root
      DB_PASSWORD: bb123456
      DB_HOST: 118.89.117.182
      DB_PORT: 5432
      DB_DATABASE: fsm-test
      # The configurations of redis cache connection.
      REDIS_HOST: redis
      REDIS_PORT: 6379
      REDIS_USERNAME: ''
      REDIS_PASSWORD: bb123456
      REDIS_DB: 0
      REDIS_USE_SSL: 'false'
      # The configurations of celery broker.
      CELERY_BROKER_URL: redis://:bb123456@redis:6379/1
      # The type of storage to use for storing user files. Supported values are `local` and `s3`, Default: `local`
      STORAGE_TYPE: local
      STORAGE_LOCAL_PATH: storage
      # The Vector store configurations.
      VECTOR_STORE: weaviate
      WEAVIATE_ENDPOINT: http://weaviate:8080
      WEAVIATE_API_KEY: WVF5YThaHlkYwhGUSmCRgsX3tD5ngdN8pkih
      # Mail configuration, support: resend
      MAIL_TYPE: ''
      # default send from email address, if not specified
      MAIL_DEFAULT_SEND_FROM: 'YOUR EMAIL FROM (eg: no-reply <no-reply@dify.ai>)'
      # the api-key for resend (https://resend.com)
      RESEND_API_KEY: ''
    depends_on:
      - redis
      - weaviate
    volumes:
      # Mount the storage directory to the container, for storing user files.
      - ./volumes/app/storage:/app/api/storage

  # Frontend web application.
  web:
    image: ${IMAGE_NAME}-web:${IMAGE_TAG}
    restart: always
    networks:
      - net
    environment:
      EDITION: SELF_HOSTED
      # The base URL of console application api server, refers to the Console base URL of WEB service if console domain is
      # different from api or web app domain.
      # example: http://cloud.dify.ai
      CONSOLE_API_URL: 'http://192.168.197.128'
      # The URL for Web APP api server, refers to the Web App base URL of WEB service if web app domain is different from
      # console or api domain.
      # example: http://udify.app
      APP_API_URL: 'http://192.168.197.128'
      # The DSN for Sentry error reporting. If not set, Sentry error reporting will be disabled.
      SENTRY_DSN: ''

  # The redis cache.
  redis:
    image: redis:6-alpine
    restart: always
    networks:
      - net
    volumes:
      # Mount the redis data directory to the container.
      - ./volumes/redis/data:/data
    # Set the redis password when startup redis server.
    command: redis-server --requirepass bb123456
    ports:
      - 6379:6379

  # The Weaviate vector store.
  weaviate:
    image: semitechnologies/weaviate:1.18.4
    restart: always
    networks:
      - net
    volumes:
      # Mount the Weaviate data directory to the container.
      - ./volumes/weaviate:/var/lib/weaviate
    environment:
      # The Weaviate configurations
      # You can refer to the [Weaviate](https://weaviate.io/developers/weaviate/config-refs/env-vars) documentation for more information.
      QUERY_DEFAULTS_LIMIT: 25
      AUTHENTICATION_ANONYMOUS_ACCESS_ENABLED: 'false'
      PERSISTENCE_DATA_PATH: '/var/lib/weaviate'
      DEFAULT_VECTORIZER_MODULE: 'none'
      CLUSTER_HOSTNAME: 'node1'
      AUTHENTICATION_APIKEY_ENABLED: 'true'
      AUTHENTICATION_APIKEY_ALLOWED_KEYS: 'WVF5YThaHlkYwhGUSmCRgsX3tD5ngdN8pkih'
      AUTHENTICATION_APIKEY_USERS: 'hello@dify.ai'
      AUTHORIZATION_ADMINLIST_ENABLED: 'true'
      AUTHORIZATION_ADMINLIST_USERS: 'hello@dify.ai'

  # The nginx reverse proxy.
  # used for reverse proxying the API service and Web service.
  nginx:
    image: nginx:latest
    networks:
      - net
    volumes:
      - ./nginx/nginx.conf:/etc/nginx/nginx.conf
      - ./nginx/proxy.conf:/etc/nginx/proxy.conf
      - ./nginx/conf.d:/etc/nginx/conf.d
    depends_on:
      - api
      - web
    ports:
      - "80:80"
- 本文标签: 其他
- 本文链接: https://blog.faceman.cn/article/20
- 版权声明: 本文由FaceMan原创发布,转载请遵循《署名-非商业性使用-相同方式共享 4.0 国际 (CC BY-NC-SA 4.0)》许可协议授权